In this post I will explain how to install, configure and run Profit Trailer (PT), a cryptocurrency trading bot, on a VPS using Ubuntu. As an extra security precaution the PT GUI is only accessible through a SSH tunnel using PuTTY with port forwarding. This avoids opening additional ports on the VPS to the outside world.
What will we cover in this post?
Prerequisites
To follow this blog post the follow prerequisites must be met:
- You have basic understanding of Linux and working from the command line.
- You have registered for one or more exchanges (Bittrex, Binance, Poloniex) you want to run Profit Trailer against.
- You have generated two separate API keys pairs for each exchanges you want to buy Profit Trailer license for. Why two separate key API pairs? Profit Trailer requires two separate API key pairs. One for the Profit Trailer license and one for trading itself. The API key pair used for the Profit Trailer license only needs minimum authorizations (read only).
- You have bought one or more Profit Trailer licenses (one for each exchange you want to trade on).
- You have a VPS to run Profit Trailer on. I use the following two providers, as they provide very good servers at extremely good value for money: RouterHosting and Contabo.
- You have setup the VPS and can connect to it through SSH. Need help? Check out this post.
- This post assumes you have followed my other posts on setting up Ubuntu and PT. If not you will need to substitute my directories for your own.
Okay time to rock & roll. Lets get the show on the road 🙂
1. Setup SSH [client]
Profit Trailer currently does not support two factor authentication (2FA), so I do not feel comfortable making it accessible over the internet. I also do not feel comfortable opening the server up to the outside world, as the server contains a lot sensitive information e.g. API secret keys. For enhanced security we will use SSH with port forwarding on the client, so that the Profit Trailer GUI can (only) be accessed through an SSH tunnel. This means that the only port that will be exposed to the outside world is the SSH port, which is more hardened and battle tested than ProfitTrader GUI.
The following steps are done on the client that will be accessing the server. I have it setup on my Windows laptop, Android phone and Android tablet. For Windows I’m using PuTTY and on Android JuiceSSH. The instruction here are limited to PuTTY.
For these instruction we will be running Profit Trailer GUI on the default port 8081.
PuTTY is an SSH client. It enables you to create profiles to connect to SSH servers.
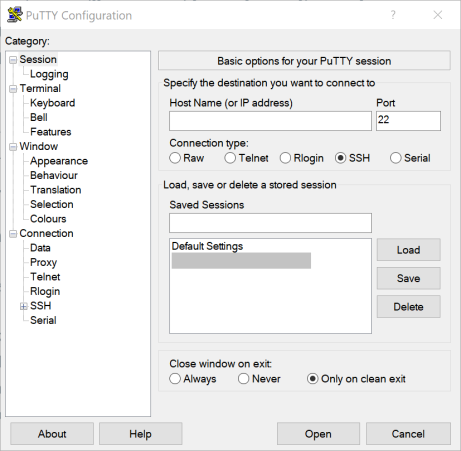
- Start PuTTY by double-clicking its executable file or hitting the Windows key and typing “putty” and hitting the “enter” key;
- PuTTY’s categories can be navigated on the left-hand side of the window. PuTTY’s initial window is the category “Session”;
- In the field “Host Name (or IP address)”, enter the IP address of the server or its Fully Qualified Domain Name (FQDN) AKA domain, e.g. nidkil.me, if it is setup in a DNS;
- Enter the port number in the “Port” field. For added security, consider changing your server’s SSH port to a non-standard port or setting up a SSH/SSL multiplexer. Check out this post for more information;
- Select the sub-category “Data” under “Connection”;
- In the field “Auto-login username” enter the user to use when logging into the SSH server. For now enter root here;
- Expand the sub-category “SSH” under the category “Connection”;
- Highlight the sub-category “Auth”;
- Click on the button “Browse”;
- Select the users private key and click the button “Open”;
- Select the sub-category “Tunnels” under the sub-category “SSH”;
- Enter the value “8081” in the field “Source port”, enter the value “localhost:8081” in the field “Destination” and click the button “Add”. This enables port forwarding from the client to the server;
- Return to the category “Session” and enter a name for this profile in the field “Saved Sessions”, e.g. [email protected] or [email protected];
- Click the button “Save” to save the profile;
- Click the button “Open” to connect to the server.
2. Install Java [server]
Profit Trailer requires Java to run. Lets go ahead and install and configure it.
# Install OpenJDK Java Runtime Envrionment (JRE)
sudo apt-get install default-jre

# Get the Java installation location
whereis java

# Set JAVA_HOME
sudo vim /etc/environment
Add the following line
JAVA_HOME="/usr/bin/java"
Save and exit the file. Lets make sure the changes are available in the current shell.
# Reload the shell so that the new variable is available
source ~/.bashrc

# Test if the environment variable is set correctly
echo $JAVA_HOME
3. Setup Telegram
First we need to setup a Telegram bot so Profit Trailer can send Telegram messages.
- Start a chat with the @BotFather Telegram bot;
- Enter the command “/newbot”;
- Enter the name of the bot, e.g. “NidkilProfitTrailerBot”;
- Enter the username of the bot, e.g. “nidkil_profittrailer_bot”;
- Now copy the bot token to use in the next section;
- Start a chat @chatidbot to get your Telegram chat id;
- Click the button “Start” at the bottom of the page.
Copy and save the bot token and chat id, as we are going to need it in a later step.
4. Install Profit Trailer [server]
Finally, its time to install Profit Trailer. Any software that is extracted and run directly should by convention be installed under /opt.
Notes:
- You should check the Profit Trailer release page on Github to get the most recent version and adjust version numbers accordingly.
- By convention setup software with the version number in the directory name and have a softlink that points to the active version (in most cases the latest version).
# Create user
sudo adduser nidkil

# Create a group for ProfiTrailer
sudo groupadd profittrailer

# Add user to the group
sudo usermod -aG profittrailer nidkil

# Create directory for Profit Trailer
sudo mkdir -p /opt/profit-trailer/pt-binance-v1.2.6.11

# Ensure that the group ownership is inherited by new files and folders created
sudo chmod -R g+s /opt/profit-trailer

# Change rights so only our user and a specific group can access and execute ProfitTrader
sudo chmod -R 770 /opt/profit-trailer

# Change ownership to our user and specific group
sudo chown -R nidkil:profittrailer /opt/profit-trailer

# Create a soft symbolic link to the current version, comes in handy for aliases
ln -s /opt/profit-trailer/pt-binance-v1.2.6.11 /opt/profit-trailer/pt-binance-cur

# Change to the Profit Trailer directory
cd /opt/profit-trailer/pt-binance-cur

# Download the latest release of Profit Trailer from GitHub
wget https://github.com/taniman/profit-trailer/releases/download/v1.2.6.11/ProfitTrailer.zip

# Unzip the file
unzip *.zip

# Move the files to the main directory
mv ProfitTrailer/* .

# Remove the zip
rm *.zip

# Remove the empty directory
rm -r ProfitTrailer

# Make start script executable
chmod u+x Run-ProfitTrailer.cmd
5. Setup Crypto Gnome’s settings [server]
Profit Trailer comes with default settings. You need to tweak these yourself to get the bot running correctly. An alternative is that you start with pre-configured settings from someone who has been running the bot for a longer period. I started out with Crypto Gnome’s Profit Trailer settings that can be found here on GitHub.
First decide with which profile you want to run Profit Trailer. Crypto Gnome’s Profit Trailer settings currently supports the following profiles:
- Conservative: 1-2% daily gains
- Moderate: 3-7% daily gains
Keep in mind, more profits means higher risks.
Important: In this post I’m setting up Profit Trailer for Binance, so all setups reflect this. If you are using a different exchange please adapt accordingly.
We will not use Crypto Gnome’s Profit Trailer settings for the application.properties and configuration.properties. These will be setup separately in the next section. Okay, lets download Crypto Gnome’s Profit Trailer settings and install the profile of your choice using the following script.
vim git-download.sh
Copy & paste the following statements into the file.
#!/bin/sh

handle_error() {
    echo "git-download  "
    echo ""
    echo " - profile: CONSERVATIVE, MODERATE, LOW, EMASPREAD"
    echo " - exchange: BINANCE, BITTREX, POLONIEX"
    echo ""
    echo "Example: git-download STANDARD BINANCE"
    exit
}

if [ $# -ne 2 ]; then
    echo "Error: Incorrect number of parameters ($#), expected 2"
    handle_error
fi

if [ "$1" = "CONSERVATIVE" ]; then
    PROFILE="(a)%20Conservative"
elif [ "$1" = "MODERATE" ]; then
    PROFILE="(b)%20Moderate"
elif [ "$1" = "LOW" ]; then
    PROFILE="(c)%20Low%20Balance%20Settings%20.2%20Below"
elif [ "$1" = "EMASPREAD" ]; then
    PROFILE="EMA%20SPREAD%20SETTINGS%20(BETA%20v1%20MUST%20EDIT%20FOR%20YOUR%20EXCHANGE)"
else
    echo "Error: Unkown profile ($1)"
    handle_error
fi

if [ "$2" = "BINANCE" ]; then
    EXCH=$2
elif [ "$2" = "BITTREX" ]; then
    EXCH=$2
elif [ "$2" = "POLONIEX" ]; then
    EXCH=$2
else
    echo "Error: Unkown exchange ($2)"
    handle_error
fi

BASE_URL="https://raw.githubusercontent.com/CryptoGnome/Profit-Trailer-Settings/master/Crypto%20Gnome%20Profit%20Trailer%20Settings/$EXCH/$PROFILE"
TMP_DIR="tmp"

del_dir() {
	if [ -d "$1" ]; then
		rm -rf $1
	fi
}

download() {
    local URL="$BASE_URL/$1"
    echo $URL
    wget $URL -P $2 -o $TMP_DIR/debug.log
}

del_dir $TMP_DIR
mkdir $TMP_DIR

download "DCA.properties" $TMP_DIR
download "INDICATORS.properties" $TMP_DIR
download "PAIRS.properties" $TMP_DIR
download "application.properties" $TMP_DIR
download "configuration.properties" $TMP_DIR
This script downloads the specified profile and installs it. It makes a backup of the original configuration. Change the permissions of the file so that it can execute and execute it.
# Change the permissions so the script can be executed
chmod 770 git-download.sh

# Execute the script
./git-download.sh CONSERVATIVE BINANCE
All right, the basics are in place. Lets start tweaking the downloaded files. When we have completed that we will move them into the right directories with a script. This is a handy way of doing it as once you have the bot running and you want to update the settings from Github you don’t want the bot to pickup the changes before you have updated the setting for your personal goals, risk profile and budget.
5. Configure Profit Trailer [server]
Now the software is installed and we have downloaded the pre-configured settings we need to tweak them to our situation and liking before we can start the bot up. We will just do the bare minimum configuration to get Profit Trailer running. Fine tuning will be a separate post. In the main Profit Trailer folder there is a files application.properties. Open it in a text editor.
vim application.properties
Update the following settings (information about the settings can be found here):
telegram.botToken = [Telegram bot token you created]
telegram.chatId = [your Telegram chat id provided by chatidbot]
trading.exchange = BINANCE
# I needed to adjust the timezone to correct the time displayed in the monitoring dashboard
server.timeZoneOffset = +01:00
server.sitename = Binance BTC
default_apiKey = [the API key used for the Profit Trailer license]
default_apiSecret = [the API secret used for the Profit Trailer license]
trading_apiKey = [the API key used for trading]
trading_apiSecret = [the API secret used for trading]
server.password = [create a password so enable configuration from the GUI]
server.disableBrowser = true
server.binanceThrottle = 5
server.enableConfig = true
For now we are going to leave the PAIRS.properties file as is. It is limited to two trades at a time. This is a good setting to start off with to get a feel for the bot and understand how it works. In the last section of this guide there are instructions how to increase the number of parallel trades.
In the tmp folder open the PAIRS.properties file.
vim ./tmp/pairs.properties
Check (and update) the following settings (information about the settings can be found here):
MARKET = BTC
ALL_trading_enabled = true
ALL_enabled_pairs = ALL
ALL_panic_sell_enabled = false
ALL_sell_only_mode = false
ALL_DCA_enabled = false
ALL_max_cost = 0.01
ALL_min_buy_balance = 0
ALL_min_buy_balance_perc = 90
The last property is the amount the bot will use per buy trade. The amount you set here depends on your balance and how much you are willing to risk. If the amount is not available, the bot will not buy.
WARNING
Once you start the bot it will start trading immediately. It will sell any existing coins that you are holding in the account!
If you have existing coins and you want to avoid them from being sold you need to add additional settings to the PAIRS.properties file to make the bot ignore them. The following settings are an example. Please note that the trade pairs are in Binance format. Bittrex and Poloniex use different formats. See here for more information, search for ALL_enabled_pairs.
ALL_hidden_pairs = BTCETH, BTCLTC
BTC-ETH_trading_enabled = false
BTC-LTC_trading_enabled = false
On Binance you can use BNB (Binance Coin) to pay feeds to avoid/minimize dust. Please check out the following post for more information.
It is now time to move the updated settings files into place. We will back up our current settings just to be safe. Create the following script.
vim cfg-activate.sh
Add the following lines to the script.
#!/bin/sh
CFG_DIR="trading"
BCK_DIR="trading-bck"
TMP_DIR="tmp"

unique_bck_dir() {
    local DT=$(date +"%Y%m%d")
    N=0
    while [ $N -lt 10 ]; do
        BCK_SUBDIR=`printf %s-%02d $DT $N`
        if [ ! -d "$BCK_DIR/$BCK_SUBDIR" ]; then
            break
        fi
        N=$((N+=1))
    done
}

unique_bck_dir

echo "Backing up current configuration ($BCK_DIR/$BCK_SUBDIR)"
mkdir $BCK_DIR/$BCK_SUBDIR
mv $CFG_DIR/* $BCK_DIR/$BCK_SUBDIR/.
mv configuration.properties $BCK_DIR/$BCK_SUBDIR/.
cp application.properties $BCK_DIR/$BCK_SUBDIR/.

echo "Activate new configuration"
mv -t $CFG_DIR/. $TMP_DIR/DCA.properties $TMP_DIR/INDICATORS.properties $TMP_DIR/PAIRS.properties
mv $TMP_DIR/configuration.properties .

rm -rf $TMP_DIR
Change the permissions of the file so that it can execute and execute it.
# Change the permissions so the script can be executed
chmod 770 cfg-activate.sh

# Execute the script
./cfg-activiate.sh
All right, the basics are in place. Installation and configuration is done. O yeah! Lets fire up Profit Trailer.
./Run-ProfitTrailer.cmd
If everything is configured correctly Profit Trailer should startup and you will see logging information showing it is running.
6. Test Profit Trailer GUI [client]
Now Profit Trailer is up and running lets fire up the browser to access the GUI. Open a browser on the client and enter the following URL.
http://localhost:8081
Enter the password you specified in the application.properties file. You will see the monitoring dashboard.
Now lets check that Telegram is setup correctly. Enter the following URL in the browser.
http://localhost:8081/settings/telegramTestMessage
Check Telegram, you should receive a test message.
7. Configure PM2 [server]
PM2 is a production process manager for applications with a built-in load balancer. It allows you to keep applications alive forever, to reload them without downtime and to facilitate common system admin tasks. In layman terms, it enables you to start a program and have it continue running in the background even when you logout of the server. We will use pm2 to run Profit Trailer.
Install pm2 with the following commands.
sudo apt install npm
sudo npm install pm2 -g
Quick overview PM2 commands (see PM2 documentation for complete list)
# Start, daemonize and auto-restart application
pm2 start [/path/to/application]

# List all processes started with PM2
pm2 list

# Display memory and cpu usage of each app
pm2 monit

# Show all information about application
pm2 show [app-name]

# Display logs of all apps
pm2 logs

# Display logs for a specific app
pm2 logs [app-name]

# Start application and name it "api"
pm2 start app.js --name="api"

# Start app and pass option "-a 34" as argument
pm2 start app.js -- -a 34

# Reset all counters
pm2 reset [app-name]

# Stop all apps
pm2 stop all

# Stop process with id 0
pm2 stop 0

# Kill and delete all apps
pm2 delete all

# Delete app with id 0
pm2 delete 0
First let change the PM2 start script to reflect the exchange it is running against. Open the pm2-ProfitTrailer.json file.
vim pm2-ProfitTrailer.json
PM2 requires an unique application name for every program it starts. Update the following setting:
"name": "pt-binance"
This ensures that the PM2 process has an unique and descriptive name. Now it is time to start Profit Trailer with PM2. Shutdown Profit Trailer in the console by pressing the keys Ctrl+C. Use the following command to start Profit Trailer using PM2.
pm2 start /opt/profit-trailer/pt-binance-cur/pm2-ProfitTrailer.json
PM2 starts Profit Trailer in the background and shows a list of processes running in PM2. One of them should be called profit-trailer-binance. Cool, on to the last step.
8. Setup aliases [aliases]
Lets add some aliases for convenience. Aliases are custom commands you can issue from the command line, that execute more complex commands. Open the alias file.
vim ~/.bash_aliases
This file is automatically loaded by ~/.bashrc. On Ubuntu 11.04 and later, it’s enabled by default. Add the following aliases.
# Convenience commands
alias lsla="ls -la"
alias cls="clear"

# List ports being listened on
alias pl="netstat -na | grep -i LISTEN"

# Reload the environment for the current shell
alias brl="source ~/.bashrc"

# PM2 commands
alias pml="pm2 list"
alias pmo='pm2 log $1'
alias pmr='pm2 restart $1'
alias pms='pm2 start $1'
alias pmt='pm2 stop $1'

# Profit Trailer Binance bot commands
alias ptbincd="cd /opt/profit-trailer/pt-binance-cur/"
alias ptbinstart="pm2 start /opt/profit-trailer/pt-binance-cur/pm2-ProfitTrailer.json"
alias ptbinstop="pm2 stop pt-binance"
alias ptbinerr='tail -n 2500 /opt/profit-trailer/pt-binance-cur/logs/ProfitTrailer.log | grep "ERROR"'
alias ptbinlog='more /opt/profit-trailer/pt-binance-cur/logs/ProfitTrailer.log | grep -v "Heartbeat"'
alias ptbintail='tail -n 250 -f /opt/profit-trailer/pt-binance-cur/logs/ProfitTrailer.log | grep -v "Heartbeat"'
The alias commands will be available on any new terminal. To have the alias commands available in the current terminal you need to run one of the aliases you just created.
brl
If you want to list the defined aliases run the following command.
alias
9. Full speed ahead [server]
If you are comfortable running the bot then it is time to lift the two trade limit and start trading at full speed. These configuration changes can be made on the server or through the GUI, which ever you prefer.
In the trading folder open the PAIRS.properties file.
vim ./trading/pairs.properties
Update all or some of the following settings (information about the settings can be found here):
# The amount the bot will buy per trade, make sure this is above the exchange minimum value
ALL_max_cost = 0.01
# Minimum balance that must be available after a trade, bot will only buy if balance does not go below this minimum
ALL_min_buy_balance = 0.0
# The number of active trades, 0 for no limit
ALL_max_trading_pairs = 0
The last property is the amount the bot will use per buy trade. The amount you set here depends on your balance and how much you are willing to risk. If the amount is not available, the bot will not buy.
10. Add another exchange [server]
As a bonus we will add another exchange. The process is pretty straight forward. Just copy the existing installation and change the exchange specific settings.
Lets start with copying the existing Binance installation.
# Copy the existing Binance Profit Trailer installation
cp -r /opt/profit-trailer/pt-binance-v1.2.6.11 /opt/profit-trailer/pt-poloniex-v1.2.6.11

# Create a soft symbolic link to the current version, comes in handy for aliases
ln -s /opt/profit-trailer/pt-poloniex-v1.2.6.11 /opt/profit-trailer/pt-poloniex-cur

# Change to Profit Trailer directory
cd /opt/profit-trailer/pt-poloniex-cur

# Clear the data file and the log
rm ./ProfitTrailerData.json ./ProfitTrailerData.json.backup ./logs/*
Now we need to update the exchange specific settings. Open the application.properties file.
vim application.properties
Change the following settings.
# Increase the port by one
server.port = 8082
# Change the exchange to Poloniex
trading.exchange = POLONIEX
# Change the server name
server.sitename = Poloniex BTC
# Update the API keys
default_apiKey = [the API key used for the Profit Trailer license]
default_apiSecret = [the API secret used for the Profit Trailer license]
trading_apiKey = [the API key used for trading]
trading_apiSecret = [the API secret used for trading]
Now we need to update the PM2 start file so that the correct exchange name is displayed. Open the pm2-start.json file.
vim pm2-ProfitTrailer.json
PM2 requires an unique application name for every program it starts. Change the following setting.
"name": "pt-poloniex"
Save and close the file. Now it is time to fire-up the new installation.
pm2 start /opt/profit-trailer/pt-poloniex-cur/pm2-ProfitTrailer.json
Finally we need to update the PuTTY profile, so that the browser can access the new installation through the SSH tunnel.
- Start PuTTY by double-clicking its executable file or hitting the Windows key and typing “putty” and hitting the “enter” key;
- Select the profile from the “Load, save or delete a stored session” list.
- Click the button “Load” to load the profile;
- Expand the sub-category “SSH” under the category “Connection”;
- Select the sub-category “Tunnels” under the sub-category “SSH”;
- Enter the value “8082” in the field “Source port”, enter the value “localhost:8082” in the field “Destination” and click the button “Add”;
- Return to the category “Session” and enter a name for this profile in the field “Saved Sessions”, e.g. [email protected] or [email protected];
- Click the button “Save” to save the profile;
- Click the button “Open” to connect to the server.
Now open a browser on the client and enter the following URL.
http://localhost:8082
Now lets add some aliases for convenience. Open the alias file.
vim ~/.bash_aliases
Add the following aliases.
alias ptpolcd="cd /opt/profit-trailer/pt-poloniex-cur/"
alias ptpolstart="pm2 start /opt/profit-trailer/pt-poloniex-cur/pm2-ProfitTrailer.json"
alias ptbinstop="pm2 stop pt-poloniex"
alias ptpoltail="tail -n 250 -f /opt/profit-trailer/pt-poloniex-cur/logs/ProfitTrailer.log | grep -v \"Heartbeat\""
alias ptpolerr="tail -n 2500 /opt/profit-trailer/pt-poloniex-cur/logs/ProfitTrailer.log | grep \"ERROR\""
alias ptpollog="more /opt/profit-trailer/pt-poloniex-cur/logs/ProfitTrailer.log | grep -v \"Heartbeat\""
The alias commands will be available on any new terminal. To have the alias commands available in the current terminal you need to run the following command.
brl
Pretty straight forward, right?
Next steps
So whats next?
- I want to start trading on the same exchange with a different market, e.g. ETH. This requires a separate trading account. I’m pondering how to do this on Bittrex as they are still not accepting new registrations and they also no longer allow existing users to have multiple accounts.
- I want to get a license for the ProfitTrader add-on ProfitTrader Feeder. It looks like an amazing tool to further optimize trades. However, I first want to better understand how ProfitTrader works before jumping in.
Summary
This is a basic introduction to installing and configuring Profit Trailer. In the future I will be posting more blogs about Profit Trailer. Stay tuned!
Related posts
If you liked this post, you might be interested in the following posts.

Pingback: PT Magic setup on Ubuntu 17.10 | Adventures of a space monkey
Pingback: PT Magic management scripts | Adventures of a space monkey
Pingback: Profit Trailer management scripts | Adventures of a space monkey