I’m busy migrating from Hosted Exchange 2007 to Office 356. While setting up the mailboxes I thought it was time to solve one of my long time irritations that my current hosted Exchange setup does not support catchall for my mail domains. It turns out that this is not straight forward to setup as Microsoft does not support it.Yes I know there are a lot of people out there who think it is bad practice to setup a catch all mailbox. Personally I use it for convenience and I think it is more customer friendly for the non tech savvy people out there. And no I do not mind going through (a lot of) spam mail to find that little gem.
O well, I Googled around and found a great blog post that explains the basics how to setup a catchall email address. However the instructions did not work as is for me and I feel they are not complete. Let me rephrase that last statement: I think Office 365 has been updated since the post was published and therefore some parts no longer work as described. Anyway, I decided to write this blog post that should cover all aspects of setting up a catchall email address under the current version of Office 365, as of 24-11-2015 🙂
Disclaimer
- I have done some shameless copy pasting from the original blog post, I hope the author will forgive me for this.
- I hope this blog post helps but I cannot guarantee it will for all setups. I have tested this on my own Office 365 system: your system may differ or have different settings that prevent this from working. So test, test and test again.
Prerequisites
- You should have one of the following Office 365 plans: Business Essentials, Business and Business premium. It might work with other plans like Home, Personal or Student, but no guarantees (see disclaimer).
- All mailboxes must be on Office 365: it will not work for hybrid scenarios.
- All DNS MX records need to point to Office 365.
Theory
The theory is simple: change a mail domain from authoritative to internal relay mail domain. This way all mail is accepted for a domain. If the recipient or email address does not exist for a mail domain it is forwarded to the another physical or logical email server using a connector. We will not use a connector, but implement a rule which intercepts the emails before it is sent to the next email server. The rule will forward all unknown mail to a catchall email address. Sounds pretty simple, right? Well it is, just make sure you follow the steps carefully.
This setup is easy to implement and easy to disable.
Step 1: Logon to Office 365 admin portal
Pretty standard, but necessary 🙂
- Log onto Office 365 Exchange admin center.
- Click on Admin top right hand side.
- Select Exchange from the drop down menu.
Step 2: Create a shared mailbox to act as catchall mailbox
I prefer to setup a separate shared mailbox to receive mail for unknown recipients. Users can be authorized to access this shared mailbox. This keeps the other mailboxes nice and tidy and is a nice separation of concerns.
From the Exchange admin center:
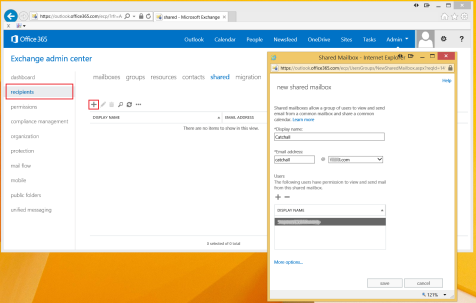
- Click the recipients option.
- Click the shared option.
- Click the plus (+) option.
- Enter the Display name, e.g. Catchall.
- Enter the Email address, e.g. catchall.
- If you have multiple domains select the correct domain from the drop down box.
- Select the users that have permission to view the mailbox by clicking the plus (+).
- Click ok to close the user selection window.
- Click save to create the shared mailbox.
Step 3: Create security group for known email addresses
To ensure known email addresses are not sent to the catchall mailbox a security group is created. This security group must contain all known users.
IMPORTANT:
- If you add an email address then it must be added to this security group.
- If you remove an email address then it must be removed from this security group.
These are the steps to create the security group and add the known users to the group:
- Click the recipients option.
- Click the plus (+) option and select the option Security group from the drop down menu.
- Enter the Display name, e.g. Known email addresses.
- Enter the Alias, e.g. known.
- Enter the Email address, e.g. known.
- If you have multiple domains select the correct domain from the drop down box.
- Enter the Description, e.g. Exception for the catchall rule.
- Select the owner(s) of the group, click on the plus (+).
- From the dialog select the email address of the owner.
- Click ok.
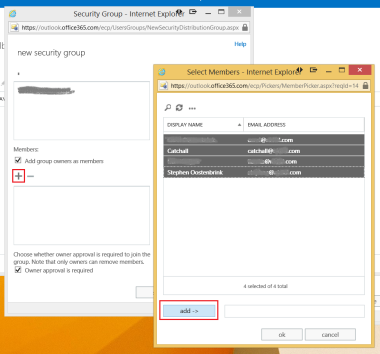
- Select the members of the group, click on the plus (+).
- Select all email addresses including the catchall email address.
- Click add ->.
- Click ok.
- Check the option Owner approval is required.
- Click save to create the security group.
Step 4: Changing from authoritative to internal relay mail domain
Next we need to change the mail domain from authoritative to internal relay mail domain. This ensures the mail domain will accepts all email even if the email address does not exist.
- Click the mail flow option.
- Click the accepted domains option.
- Select the domain you want to setup a catchall mailbox for.
- Click the pen to edit the selected domain.
- In the popup change the option from Authoritative to Internal Relay.
- Click save.
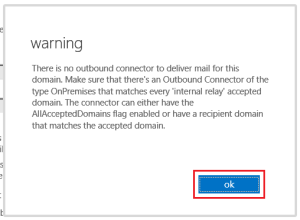
- Ignore the warning that an outbound connector does not exist to deliver mail for the domain.
Step 5: Setup a catchall email rule
Lets create the rule that handles all email that is received. Email from internal clients is ignored. Email from external clients is handled, so any email from an external client that is sent to an unknown email address is forwarded to the catchall mailbox.
- Click the mail flow option.
- Click the rules option.
- Click the plus (+) option.
- Select Create new mail rule… from the drop down menu.
- Click on More options… at the bottom of the popup.
- Enter the Name, e.g. Catchall.
- From the Apply this rule if… drop down select The sender… and then is external/internal.
- From the drop down in the popup select Outside the organization.
- Click ok.
- From the Do the following… drop down select Redirect the message to… and then these recipients.
- Select the Catchall mailbox from the list.
- Click ok.
- Click the add exception.
- From the Except if… drop down select The recipient… and then is a member of this group.
- Select the Known mailbox from the list.
- Click ok.
- Check the option Stop processing more rules.
- Enter the Comments, e.g. Rule to catchall unknown email recipients.
- Click save to create the rule.
Optionally a message header can be set so that it is possible to see a message was processed by the catchall rule. In the rule dialog do the following:
- Click the add action under the Do the following…
- From the drop down select Modify the message properties… and then set a message header.
- Click on the first Enter text… and enter X-Catchall-Rule.
- Click ok.
- Click on the second Enter text… and enter Yes.
- Click ok.
- Click save to update the rule.
Step7: Adding the catchall shared mailbox to mailbox in the Outlook Web App
Of course you want to be able to access the catchall shared mailbox from the Outlook Web App. This is pretty straight forward once you know how.
If you are using the standard version of Outlook Web App:
- Log onto the Outlook Web App with the account you want to add the catchall shared mailbox to.
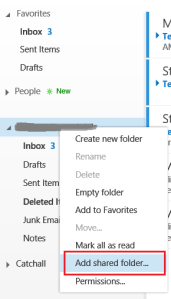
- Right click on the primary mailbox.
- From the popup menu click on the Add shared folder… option.
- Enter the name of the catchall shared mailbox, e.g. catchall, as you type the mailbox should be displayed, click on it.
- Click on Add.
If you are using the light version of Outlook Web App:
- Log onto the Outlook Web App with the account you want to access the catchall shared mailbox from.
- At the top right corner click on the image.
- From the drop down list select the option Open another mailbox…
- Enter the name of the catchall shared mailbox, e.g. catchall, as you type the mailbox should be displayed, click on it.
- The catchall mailbox will be opened in a separate tab.
Step 6: Testing time
Everything is setup so it is time to test.
From an internal client:
- Send an email to a known email address. The mail should be delivered to the recipient.
- Send an email to an unknown email address. The mail should be rejected.
From an external client, e.g. Gmail:
- Send an email to a known email address. The mail should be delivered to the recipient.
- Send an email to an unknown email address. The mail should be delivered to the catchall mailbox.
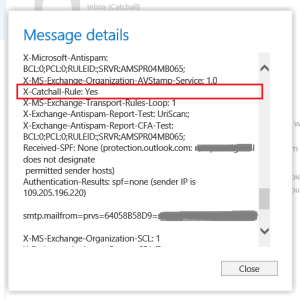
If you completed the optional step of adding the header to an unknown email recipient that is forwarded to the catchall mailbox then you can check to to see if the header is set by checking the message details.
- Select the mail that was forwarded to the catchall mailbox.
- The mail is displayed, at the top of the mail click on the three dots (…).
- From the drop down menu select the option View message details.
- Scroll down, near the end of the list you will see the X-Catchall-Rule.
That’s it! Once you understand the mechanism and know how to set this up it is pretty straight forward. Many thanks to the guys at Your It Help for doing all the heavy lifting.







Any reason I’m seeing some emails destined for good addresses stuck in the Catch-All Mailbox Inbox?
Hi Josh,
I had the same problem at rondom but only when forwarding mails to another account. I solved it by adding an additional exception to the catch all rule excluding the emailadres I was forwarding the mail to from the catch all rule. Worked for this situation might direct you towards a solution to your problem.
Just to be sure: you did add the known emailadresses to the exception?
Regards, nidkil
Hey Nidkil,
Yes, they were added to the exception per the directions above.
I wasn’t forwarding mail at all, these were new emails generated and sent from GMail to my internal mail account. They would sporadically make it to my personal inbox, but most of them would turn up in the Catch-All inbox.
Hi Josh. Really strange. I send myself a lot of reminder mails from my Gmail account and don’t have this problem. Are you sure the exception emails are correct and complete?
Regards, nidkil
Hi Josh. I do not see this problem in my setup.
It’s very possible I missed something. I plan on revisiting this as soon as I find some free time outside of work.
Please let me no if it is a setup problem. Good luck!
You have just saved my sanity. Many, many thanks!
My pleasure. Glad it helped.
Great post! Thanks for sharing. It worked 100% first time for me.
Hi, I just tried to setup following the instructions above,
but getting following error. Any thoughts would be greatly appreciated.
Action: failed
Status: 5.4.1
Remote-MTA: dns; xyz-com.mail.protection.outlook.com. (xxx.xxx.xxx.xxx,
the server for the domain xyz.com.)
Diagnostic-Code: smtp; 550 5.4.1 [[email protected]]: Recipient address rejected: Access denied [BN3NAM01FT042.eop-nam01.prod.protection.outlook.com]
On which step in the instructions?
The entire steps you provided in the article (step1 to step 5).
Thanks for the quick response.